A Tiny Home Assistant Dashboard
An old ESP32/PlatformIO project that turns Home Assistant sensor states into a small physical dashboard with OLED pages, status LEDs, and the REST API.

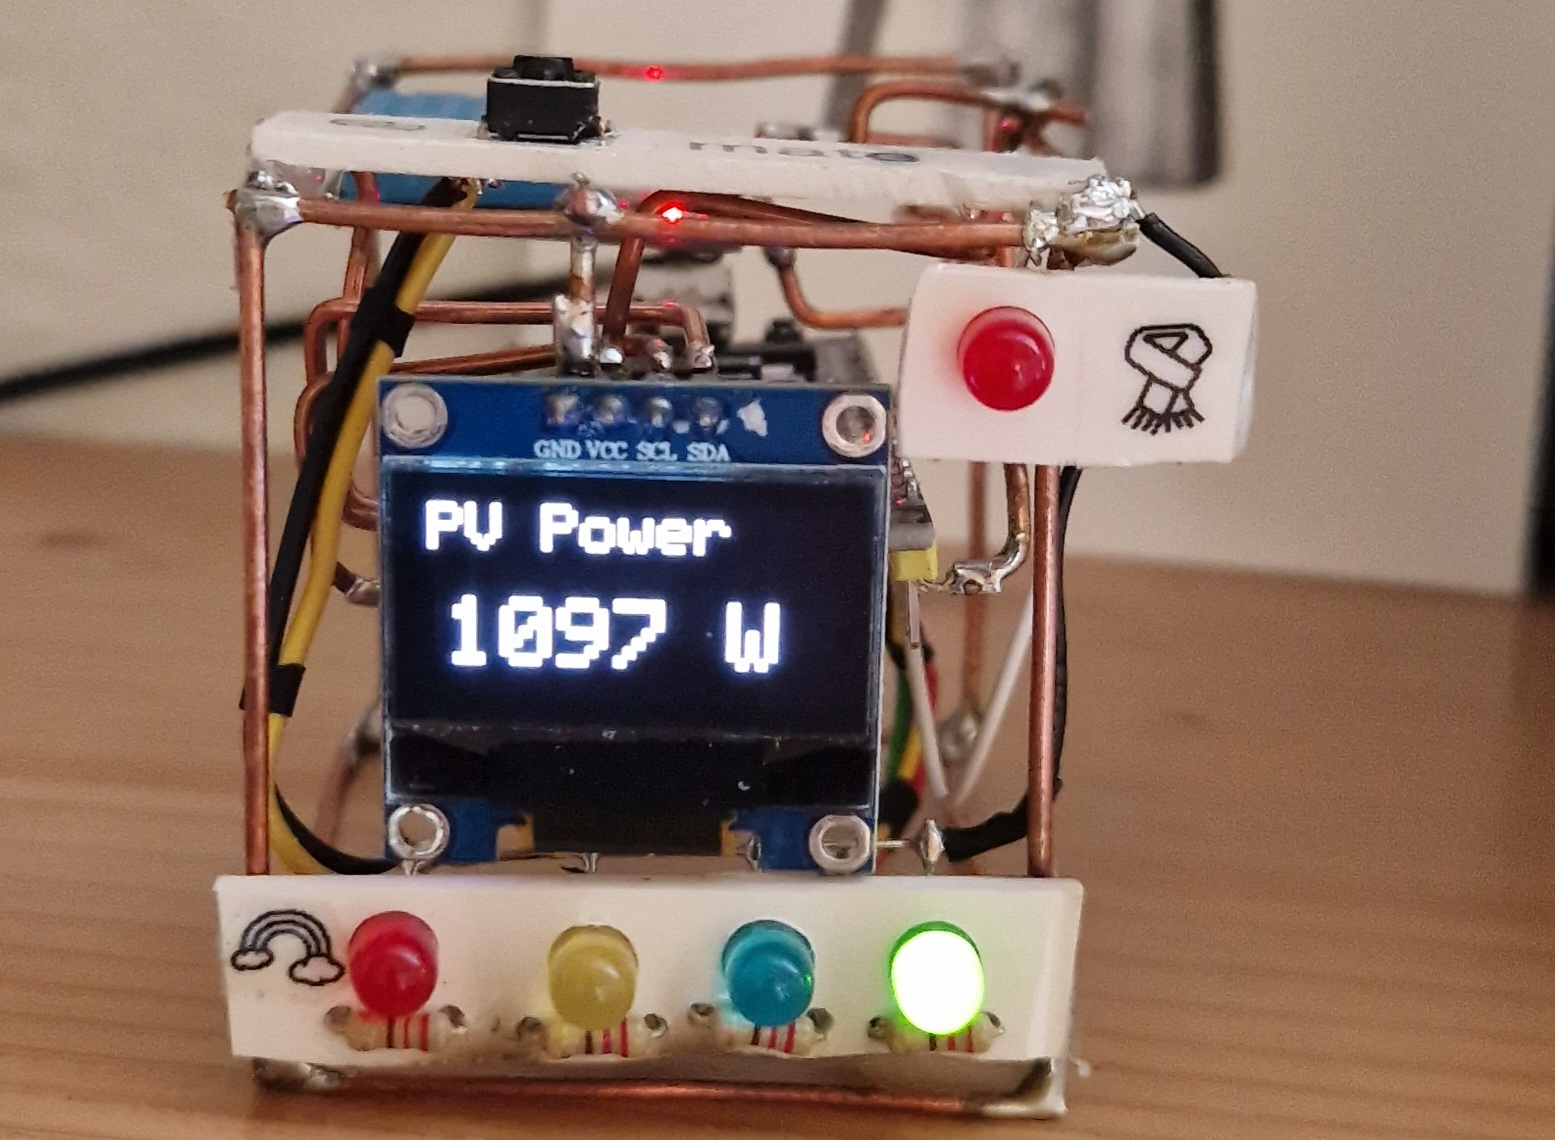
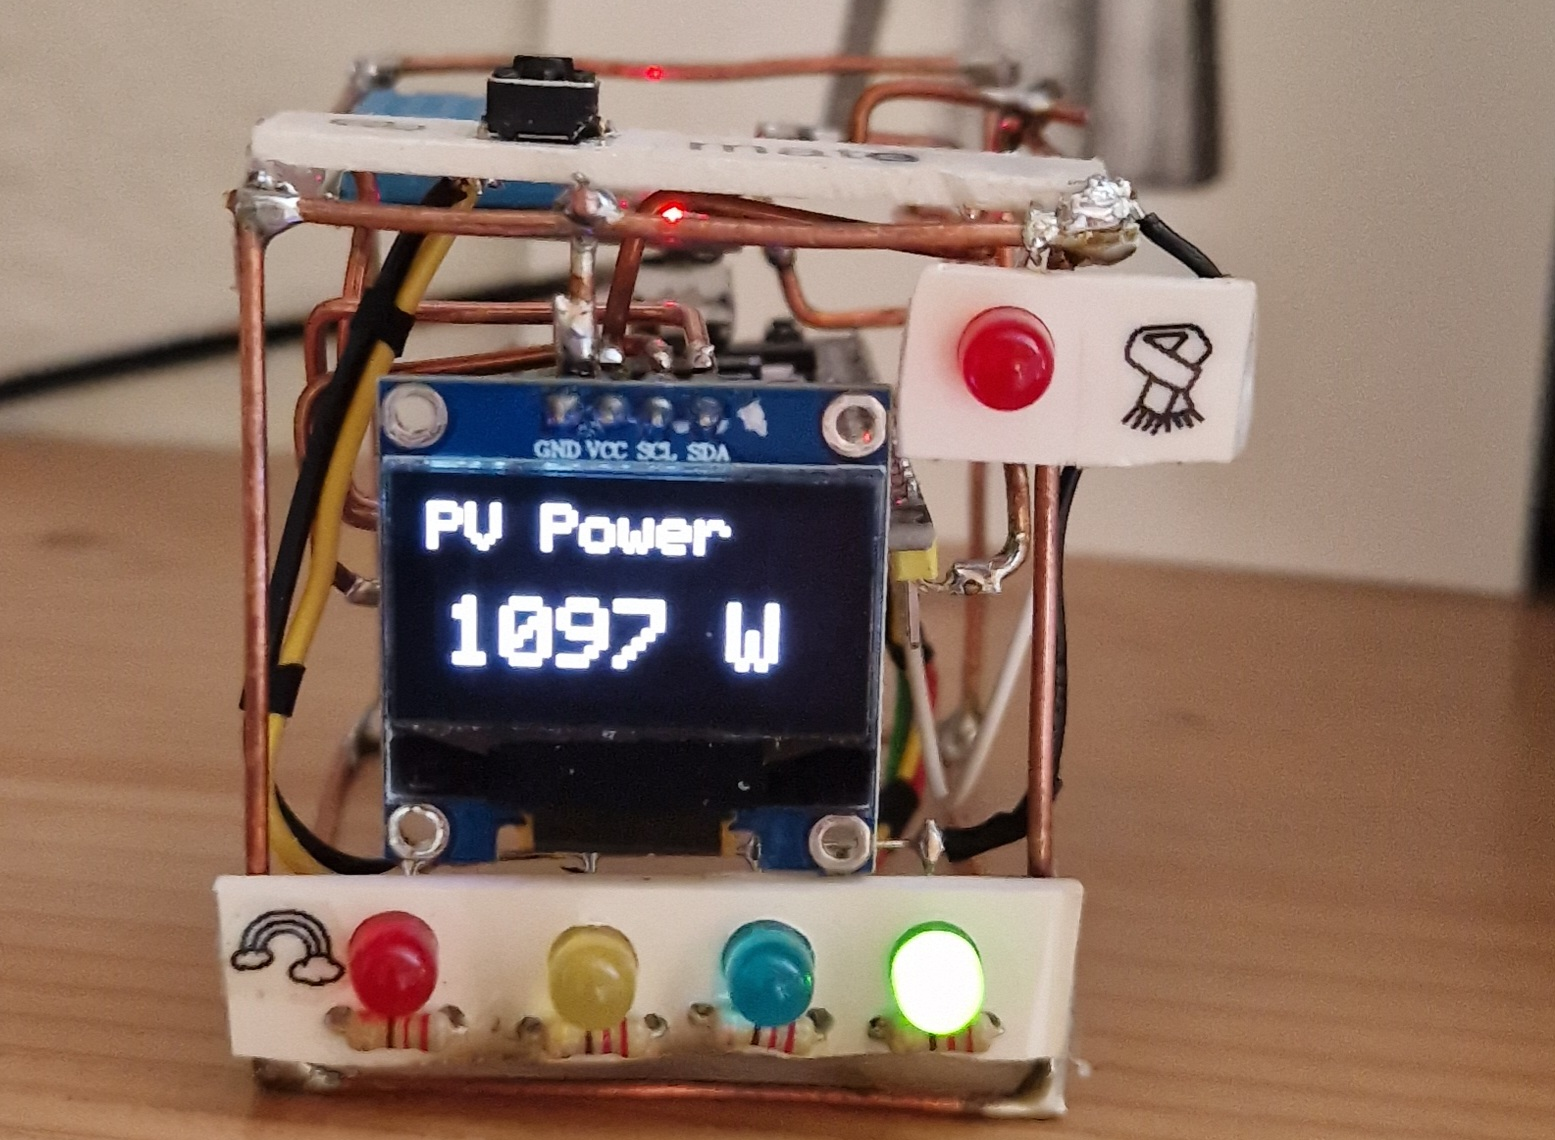
I recently opened an older repository again: Vaunt, a small ESP32 based hardware dashboard for Home Assistant. It is not a polished product, and that is exactly why I like it: it is a simple physical display that pulls real sensor values from Home Assistant and turns them into something you can see without opening a phone, tablet, or browser.
The project lives in PlatformIO, targets a nodemcu-32s board, uses an SSD1306 OLED display, a DHT11 temperature sensor, a button for menu navigation, and a few LEDs to show the current energy flow around PV, battery, grid and heating.
What the device does
Vaunt connects to Wi-Fi, calls the Home Assistant REST API, reads a list of sensor states, and renders them on a tiny OLED screen. The menu pages show things like:
- current date and time via NTP
- indoor and outdoor temperature
- district heat / heating information
- house consumption
- PV production for now and today
- battery state of charge and state of health
Some status LEDs are driven from the same data: red for grid import, green for exporting or having surplus power, yellow for PV production, blue for battery discharge, and a separate output for heating activity.
The hardware and firmware stack
The repository is a straightforward Arduino/PlatformIO project. The important dependencies are the display library, JSON parsing, and the DHT sensor library:
[env:nodemcu-32s]
platform = espressif32
board = nodemcu-32s
framework = arduino
monitor_speed = 115200

lib_deps =
    adafruit/Adafruit SSD1306@^2.5.9
    bblanchon/ArduinoJson@^6.21.3
    adafruit/DHT sensor library@^1.4.6
    adafruit/Adafruit GFX Library@^1.11.9
    adafruit/Adafruit Unified Sensor@^1.1.14
The main firmware includes Wi-Fi, HTTP, JSON, the OLED display stack and a small custom API helper:
#include <WiFi.h>
#include <HTTPClient.h>
#include <ArduinoJson.h>
#include <Adafruit_SSD1306.h>
#include <DHT.h>
#include <Api.h>
#include <Property.h>
For a public write-up, Wi-Fi credentials should obviously never be copied from the real project. Keep them in a separate secrets file, use build flags, or at least replace them before sharing code:
// Keep these out of public repositories in real projects.
const char *ssid = "YOUR_WIFI_SSID";
const char *password = "YOUR_WIFI_PASSWORD";
Enable the Home Assistant API
Home Assistant exposes its REST API through the api integration. In modern Home Assistant installations this is usually enabled by default, but if you manage your configuration manually it is still worth knowing what enables it:
# configuration.yaml
api:
The file is normally called configuration.yaml. Some people casually say configuration.yml, but Home Assistant’s default configuration file name is configuration.yaml.
After changing this file, validate and restart/reload Home Assistant as appropriate. The ESP32 then talks to endpoints like:
GET https://homeassistant.example.com/api/states/sensor.pv_powerCreate a Home Assistant access token
The ESP32 needs a Home Assistant access token. The modern way is a Long-Lived Access Token:
- Open Home Assistant.
- Click your user profile.
- Scroll to Security.
- Create a Long-Lived Access Token.
- Copy it once and store it safely.
The old api_password approach is not what I would use for a project like this anymore. The REST API request should use an Authorization header:
Authorization: Bearer YOUR_HOME_ASSISTANT_LONG_LIVED_ACCESS_TOKENThe sensor registry
The neat part of the project is the small Property registry. Each entry maps a Home Assistant entity id to a local lookup name and a refresh interval. This keeps the display code readable: the UI can ask for PV, Grid or Battery_State instead of repeating Home Assistant entity IDs everywhere.
For the public article I anonymized and generalized a few entity names, but the pattern is the same:
#define NUM_PROPERTIES 13
Property properties[NUM_PROPERTIES];

void registerProperties()
{
  int cur = 0;

  properties[cur++] = Property("sensor.active_power", 1000, "Grid");
  properties[cur++] = Property("sensor.house_consumption", 1000, "House");
  properties[cur++] = Property("sensor.pv_power", 1000, "PV");
  properties[cur++] = Property("sensor.today_s_pv_generation", 60000, "PV_Today");
  properties[cur++] = Property("sensor.total_pv_generation", 60000, "PV_Total");
  properties[cur++] = Property("sensor.battery_power", 1000, "Battery_Power");
  properties[cur++] = Property("sensor.battery_state_of_charge", 10000, "Battery_State");
  properties[cur++] = Property("sensor.heating_power", 5000, "Heating");
  properties[cur++] = Property("sensor.outdoor_temperature", 5000, "Outdoor_Temp");
  properties[cur++] = Property("sensor.boiler_temperature", 10000, "Boiler_Temp");
  properties[cur++] = Property("sensor.heating_flow_temperature", 10000, "Flow_Temp");
  properties[cur++] = Property("sensor.heating_running", 30000, "Heating_Running");
  properties[cur++] = Property("sensor.battery_state_of_health", 60000, "Battery_SoH");
}
Short refresh intervals are useful for live power values. Slower intervals are fine for totals and health values. This prevents the ESP32 from hammering Home Assistant unnecessarily.
Calling the Home Assistant REST API from Arduino/C++
The API helper does three things:
- Build the URL
/api/states/<entity_id>. - Add the bearer token as an HTTP header.
- Parse the JSON response and return the numeric state plus unit.
#include <HTTPClient.h>
#include <ArduinoJson.h>
#include <Payload.h>

const char *homeAssistantUrl = "https://homeassistant.example.com";
const char *token = "YOUR_HOME_ASSISTANT_LONG_LIVED_ACCESS_TOKEN";

Payload GetApiValue(String sensor)
{
  if (WiFi.status() == WL_CONNECTED)
  {
    HTTPClient http;
    String uri = String(homeAssistantUrl) + "/api/states/" + sensor;

    http.useHTTP10(true);
    http.begin(uri.c_str());
    http.addHeader("Authorization", "Bearer " + String(token));

    int httpResponseCode = http.GET();
    if (httpResponseCode > 0)
    {
      String response = http.getString();
      if (response != "null")
      {
        DynamicJsonDocument doc(2048);
        deserializeJson(doc, response);

        float value = doc["state"];
        String unit = doc["attributes"]["unit_of_measurement"];
        http.end();
        return Payload(value, unit);
      }
    }

    Serial.print("Error code: ");
    Serial.println(httpResponseCode);
    http.end();
  }

  return Payload();
}
A successful Home Assistant state response contains a state field and an attributes object. For display purposes, Vaunt only needs the current state and the unit_of_measurement attribute:
{
  "entity_id": "sensor.pv_power",
  "state": "1234",
  "attributes": {
    "unit_of_measurement": "W"
  }
}
The helper wraps those two values in a tiny Payload class:
class Payload {
public:
    float value;
    String unit;

    Payload(float value, String unit) : value(value), unit(unit) {}
    Payload() : value(0.0), unit("n/a") {}

    String print(int precision) {
        return String(value, precision) + " " + unit;
    }

    String printValue(int precision) {
        return String(value, precision);
    }

    int toInt() {
        return (int)value;
    }
};
Updating values without blocking the UI
The main loop keeps the device responsive by checking whether each property is due for an update. If the refresh interval has elapsed, the firmware calls the API again and stores the new payload.
void loop()
{
  long currentTime = millis();

  cursor();
  menue();

  for (int i = 0; i < NUM_PROPERTIES; i++)
  {
    if (currentTime - properties[i].last_update >= properties[i].frequency)
    {
      properties[i].payload = GetApiValue(properties[i].sensor);
      properties[i].last_update = currentTime;
      Serial.println(properties[i].lookup_name + ": " + properties[i].payload.print(1));
    }
  }

  gridCurrent = lookup("Grid").value;
  batteryPower = lookup("Battery_Power").value;
  pvPower = lookup("PV").value;

  // LEDs visualize the current energy flow.
}
This pattern is simple but effective: each value defines how often it should be refreshed, and the display code can keep rendering from the last known payload.
The menu pages
The OLED display has several pages: a default overview, power, battery, heating, current PV power, and total PV generation. A button on CURSOR_PIN advances the menu.
void cursor()
{
  if (digitalRead(CURSOR_PIN) == 0)
  {
    currentMenue++;
    currentMenue = currentMenue % menueSize;
    menue();
    delay(250);
  }
}
Each page clears the display, writes a title or values, and calls display.display(). It is old-school embedded UI code, but it is easy to debug and easy to change.
Status LEDs as an energy-flow indicator
The project also uses GPIO outputs to visualize the current power situation. In simplified form:
- grid import with no battery discharge: red LED
- battery discharge: blue LED
- PV production: yellow LED
- surplus / export condition: green LED
- heating active: heating LED
This turns Home Assistant data into something ambient. You do not need to read a dashboard to see if the house is importing power, exporting power, charging/discharging, or heating.
What I would change today
The project is old, and that is visible in a few places. If I rebuilt it today, I would change these things:
- move Wi-Fi credentials, Home Assistant URL and token out of source code
- use HTTPS-only Home Assistant URLs
- handle non-numeric states like
unknownandunavailableexplicitly - avoid parsing every state as
floatif a sensor is binary or textual - add retry/backoff logic for failed API calls
- make the sensor list configurable instead of compiled into the firmware
- consider ESPHome if the goal is maintainability rather than learning and hacking
But the old code still shows the core idea nicely: Home Assistant can be a data source for small physical devices, not only for dashboards in a browser.
Security notes before copying this idea
- Do not commit real Wi-Fi passwords.
- Do not commit Home Assistant tokens.
- Do not publish your real Home Assistant URL if it exposes internal infrastructure.
- Use the smallest practical token scope/user for a device like this.
- Rotate the token if it ever appeared in a repository.
The code snippets above intentionally use placeholders like YOUR_WIFI_SSID, YOUR_WIFI_PASSWORD, https://homeassistant.example.com and YOUR_HOME_ASSISTANT_LONG_LIVED_ACCESS_TOKEN.
Conclusion
Vaunt is a small, imperfect, very practical Home Assistant side project. It takes values that already exist in Home Assistant and brings them into the physical world: a little OLED display, a few LEDs, and enough context to understand what the house is doing at a glance.
That is the kind of homelab project I still like: not because it is complicated, but because it connects software, hardware and the real house in a visible way.